项目结构
首先,从了解项目的结构入口,官方的文档可以说是十分详尽了。
译自https://github.com/vuejs/vue/blob/dev/.github/CONTRIBUTING.md的 Project Structure 部分
- script: 包含构建相关的脚本和配置文件,在大多数情况下无需去了解。然而,在你自己了解一下的文件时将变得十分有帮助
- script/alias.js: 导出所有源代码和测试文件中用到的别名的模块
- script/config.js: 包含所有在dist/中的文件的构建配置。如果想要找到dist文件的源代码入口文件可以检查这个文件
- dist: 包含用于分发的构建文件,注意这个目录词语在发布的时候才会更新
- flow: 包含 Flow 的类型声明,这些声明在全局被加载并且你可以看到他们在源代码的类型注释中
- packages: 包含 vue-server-renderer 和 vue-template-compiler,是作为单独的 npm 包发布的,他们由源代码自动的生成且通常和主要的vue包有着相同的版本
- test: 包含所有的测试,单元测试是用 Jasmine 框架编写的;用 Karma 框架跑的, e2e测试是为Nightwatch.js编写和运行的。
- src: 很明显,包含源代码,代码标准是 ES2015 类型注释是 Flow
- compiler: 包含编译 template-to-renderer-function 的代码
- core: 包含通用的、平台无关的运行时代码
- observer: 包含与响应系统相关的代码
- vdom: 包含与创建 vdom 元素和 patch 相关的代码
- instance: 包含 Vue 实例 constructor 和原型方法
- global-api: 全局api
- components: 通用抽象组件,目前只有 keep-alive一个
- server: 包含服务器端渲染的相关代码
- platforms: 包含平台特定的代码
- sfc: 包含单文件组件分析逻辑,在 vue-template-compiler 包中有用到
- shared:
- types: 包含 typescript 类型定义
Vue 构造函数
从 package.json 入手
1
| "dev": "rollup -w -c scripts/config.js --environment TARGET:web-full-dev"
|
按部就班的查找线索
那么就去找到 config.js 找到配置文件中的入口与出口
1 2 3 4 5 6 7 8 9
| 'web-full-dev': { entry: resolve('web/entry-runtime-with-compiler.js'), dest: resolve('dist/vue.js'), format: 'umd', env: 'development', alias: { he: './entity-decoder' }, banner },
|
可以看到 entry入口文件打包后就是vue.js 直接去找 /src/platforms/web/entry-runtime-with-compiler.js文件
找到该文件 可以看到引入了这个文件./runtime/index
下图是梳理过的文件引用关系:
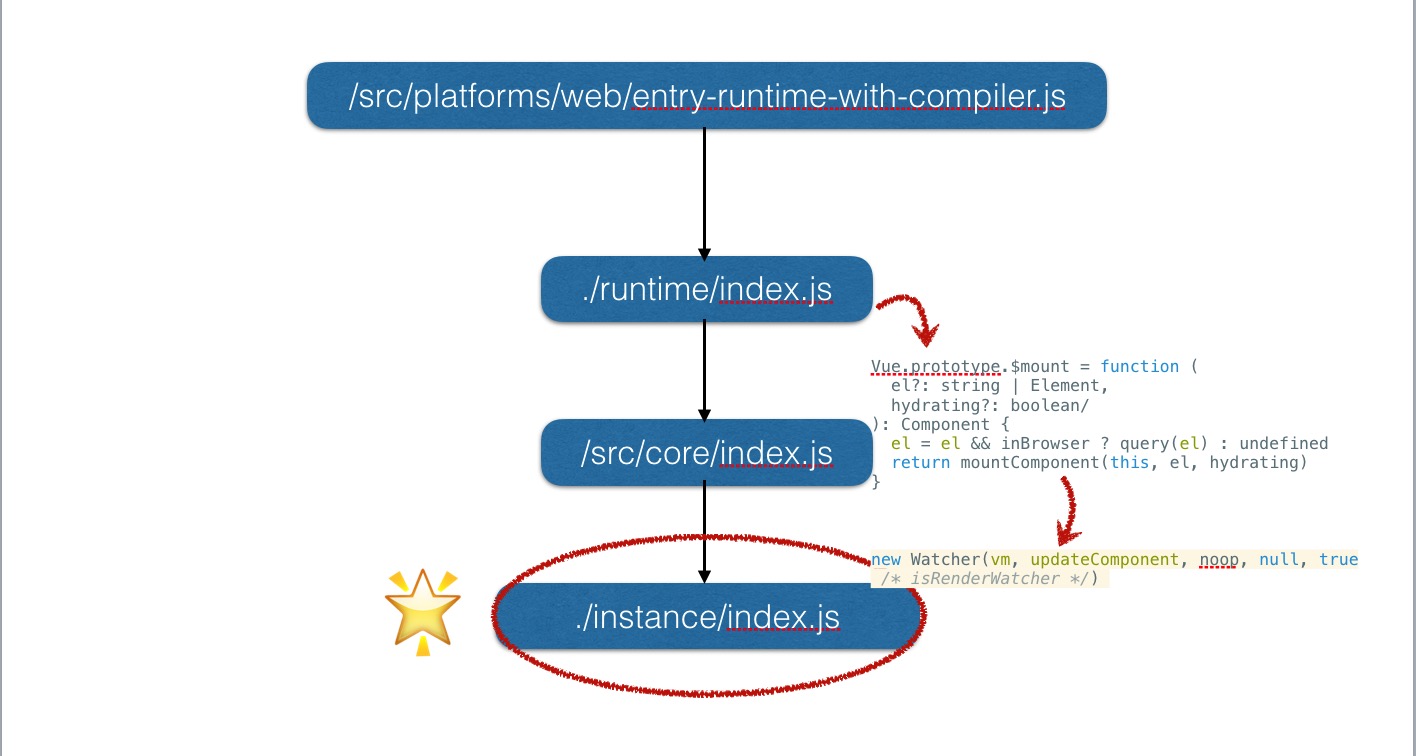
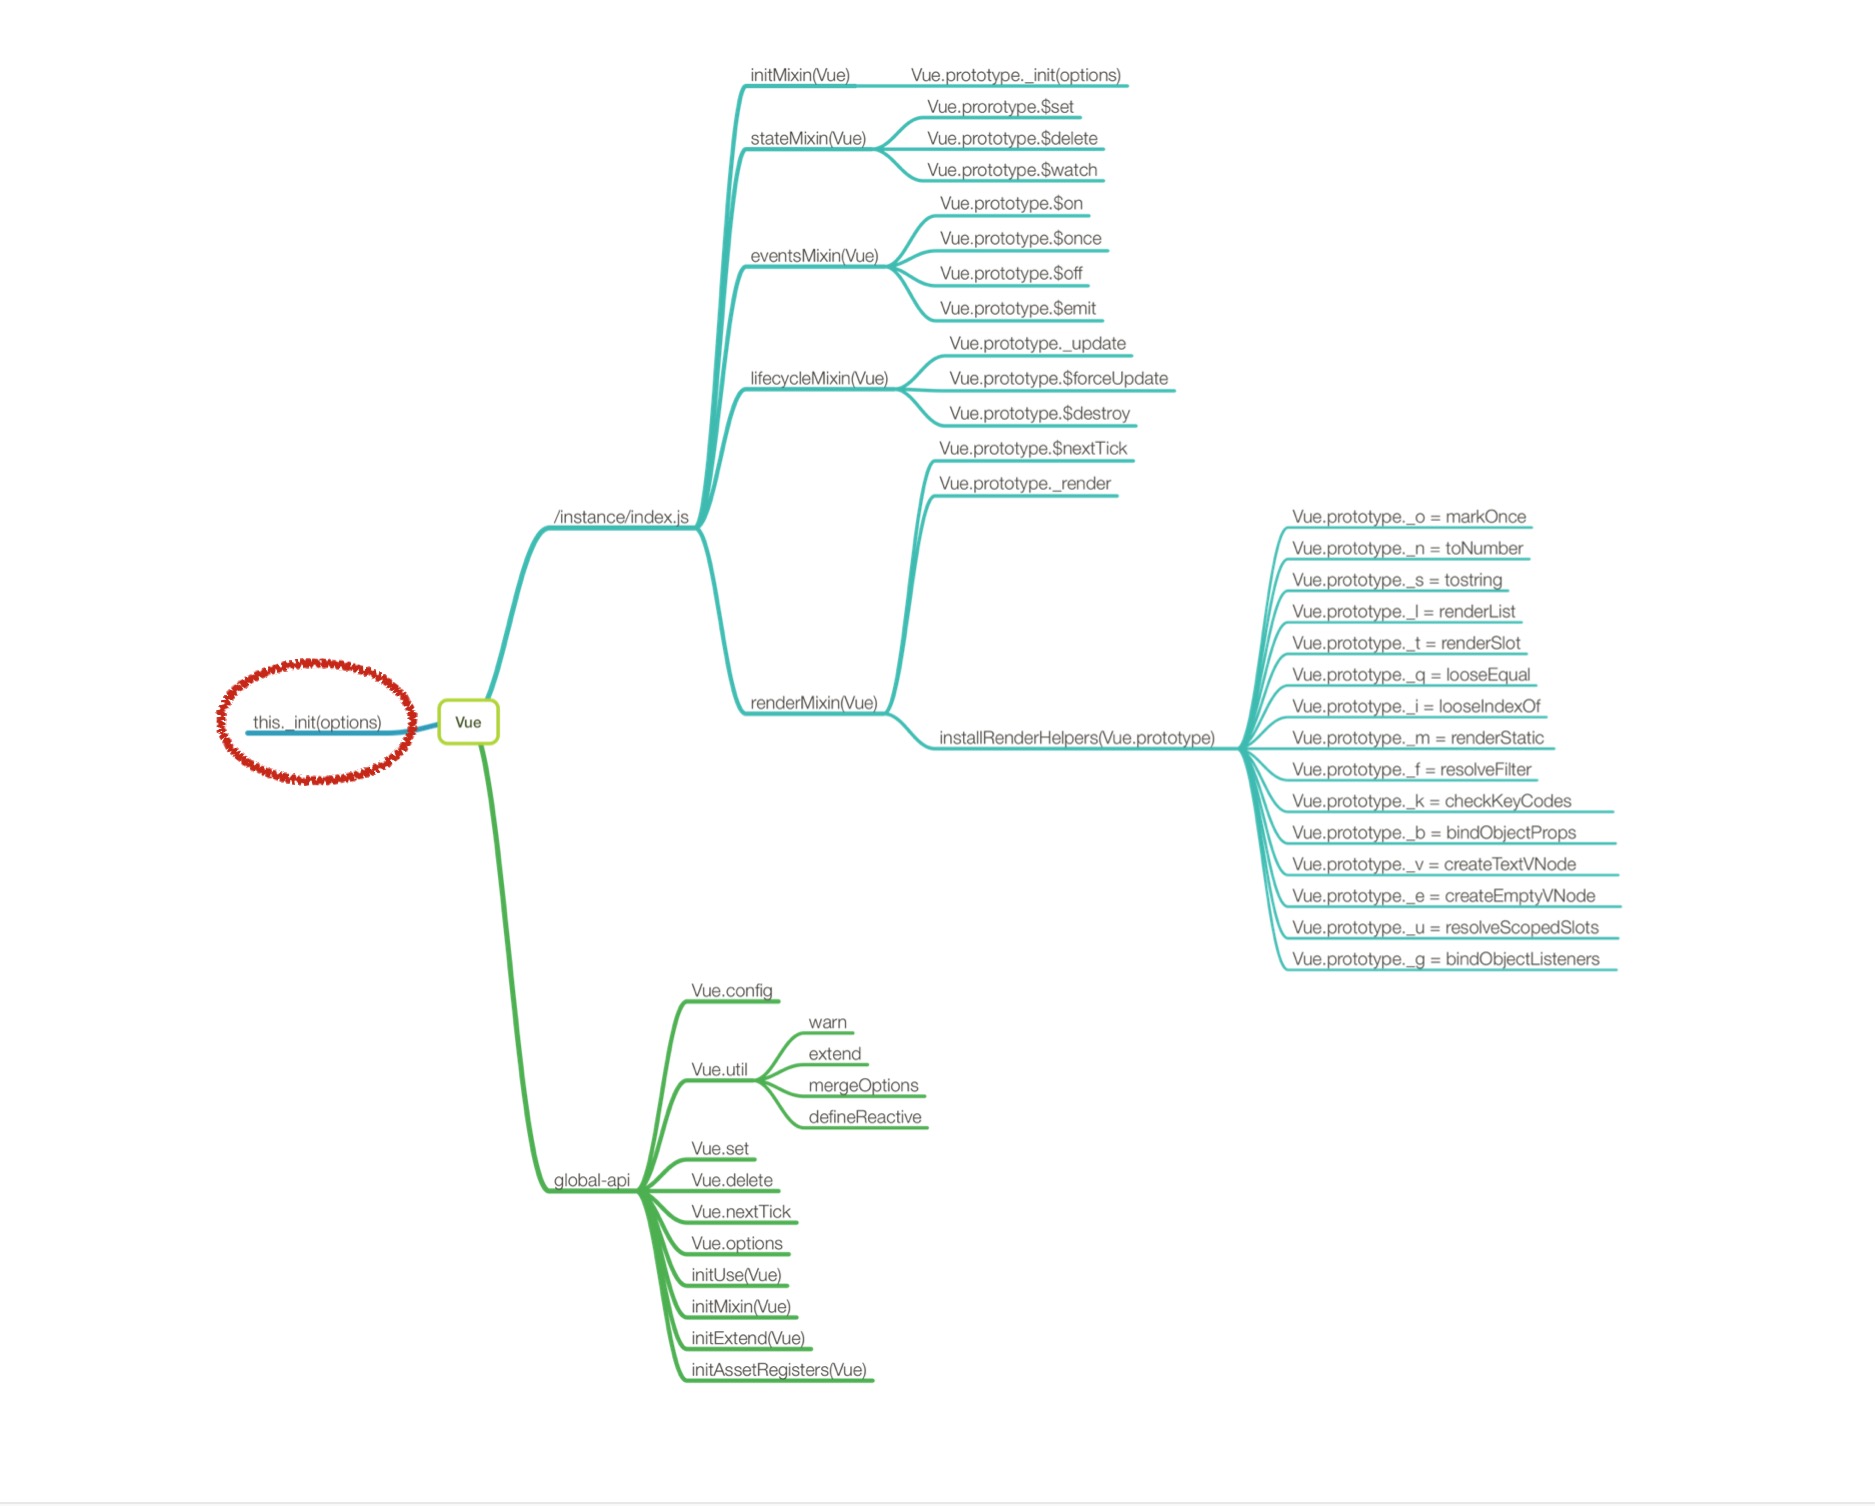
instance/index.js 文件中就是Vue最初声明的地方了,代码如下
1 2 3 4 5 6 7 8 9 10 11 12 13 14 15 16 17 18 19 20 21 22 23
| import { initMixin } from './init' import { stateMixin } from './state' import { renderMixin } from './render' import { eventsMixin } from './events' import { lifecycleMixin } from './lifecycle' import { warn } from '../util/index' function Vue (options) { if (process.env.NODE_ENV !== 'production' && !(this instanceof Vue) ) { warn('Vue is a constructor and should be called with the `new` keyword') } this._init(options) } initMixin(Vue) stateMixin(Vue) eventsMixin(Vue) lifecycleMixin(Vue) renderMixin(Vue) export default Vue
|
这段代码中引入了一些依赖的函数,并且在这里 Vue 实例被挂载了方法和属性并导出到 /src/core/index.js 中继续被处理
以下是/src/core/index.js文件
1 2 3 4 5 6 7 8 9 10 11 12 13 14 15 16 17 18 19 20
| import Vue from './instance/index' import { initGlobalAPI } from './global-api/index' import { isServerRendering } from 'core/util/env' initGlobalAPI(Vue) Object.defineProperty(Vue.prototype, '$isServer', { get: isServerRendering }) Object.defineProperty(Vue.prototype, '$ssrContext', { get () { return this.$vnode && this.$vnode.ssrContext } }) Vue.version = '__VERSION__' export default Vue
|
5行 initGlobalAPI(Vue) Vue被作为参数传入initGlobalAPI方法中
7、11行 分别给Vue.prototype挂载$isServer和$ssrContext属性
18行 最后 给Vue对象添加version版本属性
到现在,Vue已经具有了一下的方法和属性
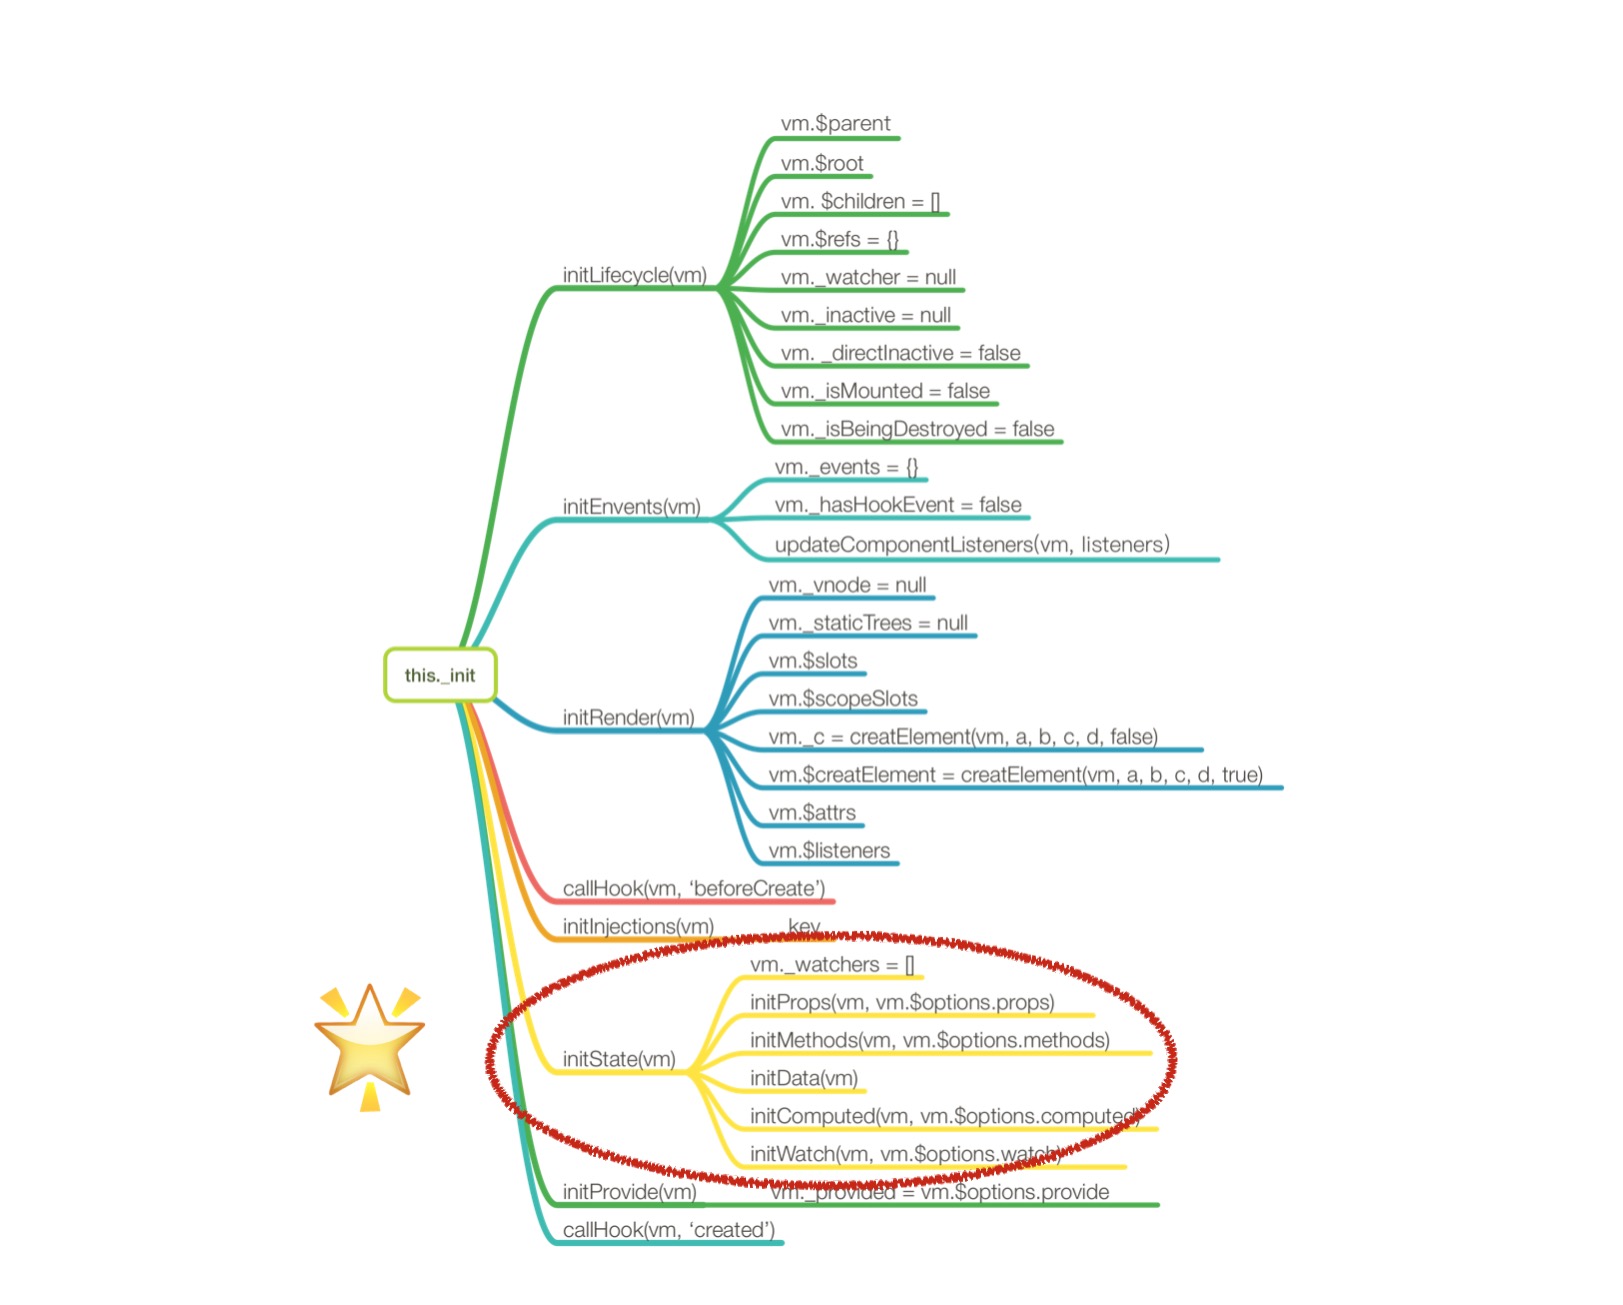
此时可以看看 Vue.prototype._init(option)函数究竟做了什么
梳理结果如下
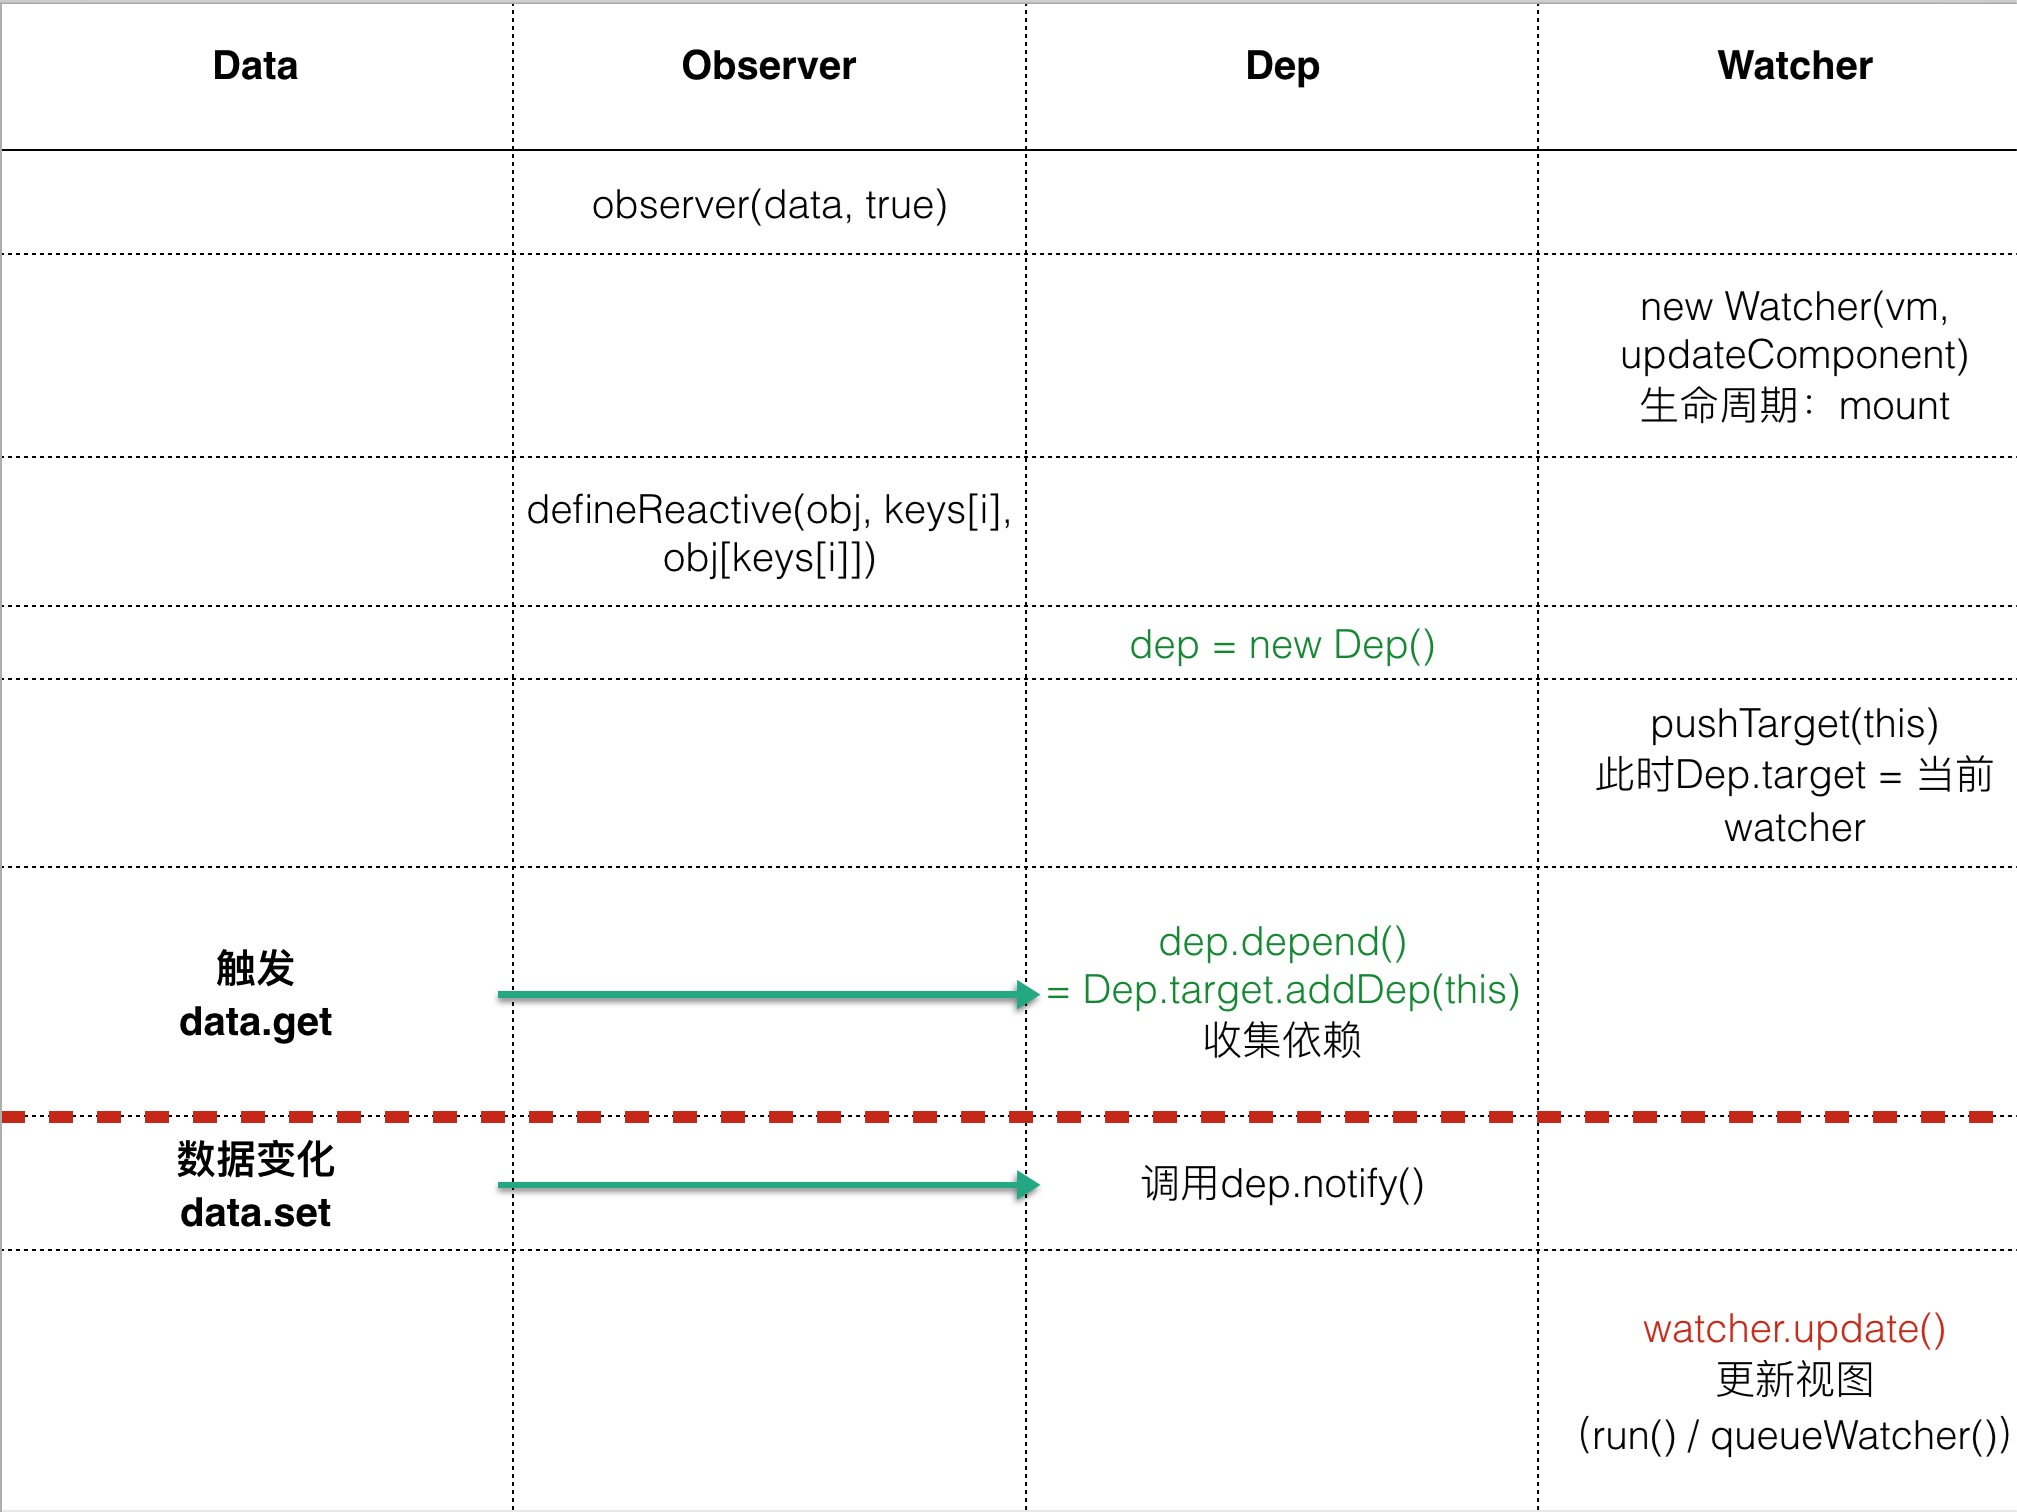
响应式原理
在答题了解了 Vue 的初始化过程都做了哪些工作后,终于可以接近响应式原理了(激动)
在上一张图的红圈部分需要格外注意的是 initState(vm) 方法
1 2 3 4 5 6 7 8 9 10 11 12 13 14 15
| export function initState (vm: Component) { vm._watchers = [] const opts = vm.$options if (opts.props) initProps(vm, opts.props) if (opts.methods) initMethods(vm, opts.methods) if (opts.data) { initData(vm) } else { observe(vm._data = {}, true ) } if (opts.computed) initComputed(vm, opts.computed) if (opts.watch && opts.watch !== nativeWatch) { initWatch(vm, opts.watch) } }
|
这段代码的重点是 7 行的 initData(vm) 函数 找到该函数 可以看到关键的一句代码
这里的 observe 函数中 实例化了一个 Observe 类,这个类就是 Vue 实现响应式原理的三个重要的类之一(Observe、Dep、Watcher)
首先找到 Observe 类,去看看他里面实现的是什么样的功能
1 2 3 4 5 6 7 8 9 10 11 12 13 14 15 16 17 18 19 20 21 22 23 24 25 26 27 28 29 30 31 32 33 34 35 36 37 38 39 40 41 42 43 44 45 46 47 48
| * Observer class that are attached to each observed * object. Once attached, the observer converts target * object's property keys into getter/setters that * collect dependencies and dispatches updates. */ export class Observer { value: any; dep: Dep; vmCount: number; constructor (value: any) { this.value = value this.dep = new Dep() this.vmCount = 0 def(value, '__ob__', this) if (Array.isArray(value)) { const augment = hasProto ? protoAugment : copyAugment augment(value, arrayMethods, arrayKeys) this.observeArray(value) } else { this.walk(value) } } * Walk through each property and convert them into * getter/setters. This method should only be called when * value type is Object. */ walk (obj: Object) { const keys = Object.keys(obj) for (let i = 0; i < keys.length; i++) { defineReactive(obj, keys[i], obj[keys[i]]) } } * Observe a list of Array items. */ observeArray (items: Array<any>) { for (let i = 0, l = items.length; i < l; i++) { observe(items[i]) } } }
|
walk函数中对data进行遍历,调用defineReactive函数;defineReactive接受object、key以及value作为参数
defineReactive函数代码
1 2 3 4 5 6 7 8 9 10 11 12 13 14 15 16 17 18 19 20 21 22 23 24 25 26 27 28 29 30 31 32 33 34 35 36 37 38 39 40 41 42 43 44 45 46 47 48 49 50 51 52 53 54 55 56 57 58
| * Define a reactive property on an Object. */ export function defineReactive ( obj: Object, key: string, val: any, customSetter?: ?Function, shallow?: boolean ) { const dep = new Dep() const property = Object.getOwnPropertyDescriptor(obj, key) if (property && property.configurable === false) { return } const getter = property && property.get const setter = property && property.set let childOb = !shallow && observe(val) Object.defineProperty(obj, key, { enumerable: true, configurable: true, get: function reactiveGetter () { const value = getter ? getter.call(obj) : val if (Dep.target) { dep.depend() if (childOb) { childOb.dep.depend() if (Array.isArray(value)) { dependArray(value) } } } return value }, set: function reactiveSetter (newVal) { const value = getter ? getter.call(obj) : val if (newVal === value || (newVal !== newVal && value !== value)) { return } if (process.env.NODE_ENV !== 'production' && customSetter) { customSetter() } if (setter) { setter.call(obj, newVal) } else { val = newVal } childOb = !shallow && observe(newVal) dep.notify() } }) }
|
可以看到,defineReactive主要的工作是将data的属性转换为访问器属性
getter方法中的dep.depend()是在添加监听
setter方法中的dep.notify就是在更新视图
在这里可以看到 出现了Dep 类
具体看 Dep 的声明代码
1 2 3 4 5 6 7 8 9 10 11 12 13 14 15 16 17 18 19 20 21 22 23 24 25 26 27 28 29 30 31 32 33 34 35 36 37 38 39 40 41 42 43 44 45 46 47 48 49 50 51 52 53 54 55 56 57 58
| import type Watcher from './watcher' import { remove } from '../util/index' let uid = 0 * A dep is an observable that can have multiple * directives subscribing to it. */ export default class Dep { static target: ?Watcher; id: number; subs: Array<Watcher>; constructor () { this.id = uid++ this.subs = [] } addSub (sub: Watcher) { this.subs.push(sub) } removeSub (sub: Watcher) { remove(this.subs, sub) } depend () { if (Dep.target) { Dep.target.addDep(this) } } notify () { const subs = this.subs.slice() for (let i = 0, l = subs.length; i < l; i++) { subs[i].update() } } } Dep.target = null const targetStack = [] export function pushTarget (_target: Watcher) { if (Dep.target) targetStack.push(Dep.target) Dep.target = _target } export function popTarget () { Dep.target = targetStack.pop() }
|
notify 方法就是在执行后续的改变了,他向订阅者发布消息,从而驱动视图更新
这样 可以得出:getter方法中的dep.depend()是在添加监听,setter方法中的dep.notify就是在更新视图了
存疑:Dep.target 的作用是什么呢,为什么判断完他的值之后把null赋值给他了呢
订阅者则是 watcher —— /core/observer/watcher.js(简化后的代码)
1 2 3 4 5 6 7 8 9 10
| export default class Watcher { this.getter = expOrFn get () { pushTarget(this) value = this.getter.call(vm, vm) popTarget() this.cleanupDeps() } }
|
Dep相当于一个中转,去添加和删除“依赖”,在Watcher中,首先调用getter去添加依赖,在数据发生改变时,就会自动的调用回调函数。
总结
根据以上的分析,可以根据以下的表格来理解(按照时序)